Managing access
StarTree enables granular control over data access within the StarTree environment through the implementation of Role-Based Access Control (RBAC). Role-Based Access Control (RBAC) is an approach to restricting access to authorized users. StarTree RBAC Manager provides a powerful mechanism to craft policies that match the needs of any data team. Let’s get familiar with these mechanisms.
When you enable access control, StarTree integrates with your organization's Identity Provider (IDP) to authenticate users and groups. After successful authentication, StarTree enforces access control policies based on the roles you assign.
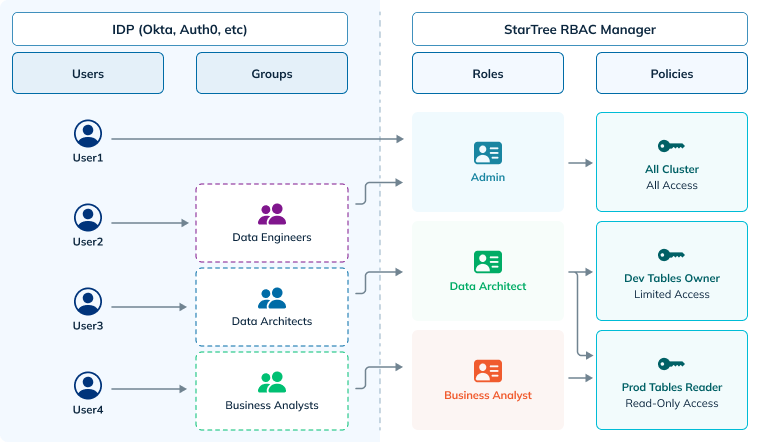
The diagram shows a typical RBAC system containing users/groups, their roles, and the associated policies. Together, these attributes form the set of rules that define who can access a resource.
Access Control features require initial configuration and may involve integration with your existing identity provider. Please reach out to StarTree Support or your account team to discuss your specific requirements and enable these features.
Using the Security Manager interface, you can:
- Define and manage custom policies: Create and modify fine-grained access control rules based on specific conditions and requirements.
- Create and manage custom roles: Group together related permissions and policies into easily manageable roles.
- Assign roles to users and groups: Granularly control access to StarTree resources for different entities within the organization.
Policies, Roles, and Assignments
StarTree utilizes Role-Based Access Control (RBAC) to manage data access. RBAC is a security model where access rights are defined by assigning roles to users, users groups, and API tokens. Roles are collections of policies that define permissions for specific resources.
Policies
A policy defines the rules that govern access to specific resources. It essentially outlines which actions (like reading, writing, or deleting) are permitted or prohibited on a particular resource, such as a table.
Policies are the building blocks for granular control over data access within the StarTree platform.
In the Policies screen, you can:
- View existing policies: Easily browse and review all defined policies within the system.
- Create new policies: Define custom policies with specific conditions and permissions, such as:
- Resource-level access: Control access to specific tables, workspaces, and environments.
- Operation-level access: Control allowed operations on resources (e.g., read, write, delete, query).
Roles
A Role represents a collection of one or more policies. It acts as a container for a set of permissions that define what actions a user or group is authorized to perform on specific resources.
Think of it as a job title or a set of responsibilities. For example, a 'Data Analyst' role might include policies granting read access to certain tables, the ability to run queries, and potentially limited write access for specific purposes.
Roles simplify user access management by grouping together relevant policies, making it easier to assign permissions to users based on their job functions or responsibilities.
The Roles screen allows you to:
- View existing roles: Easily browse and review all defined roles within the system.
- Create new roles: Define custom roles by grouping together relevant policies and permissions.
- Edit roles: Add or remove policies associated with an existing custom role.
Role Assignments
Role assignment is the process of associating a specific role with a particular user or group. This effectively grants the assigned entity the permissions defined within the associated role.
Think of it as assigning a job title to an employee. When you assign the 'Data Analyst' role to a user, they automatically inherit all the permissions associated with that role, such as read access to specific datasets and the ability to run queries.
Role Assignment is the crucial step that connects users and groups to the specific permissions defined within Roles, enabling effective and granular control over data access within the StarTree environment.
By default, the first user in an environment is assigned the system-admin role, which grants them full access to all resources and actions in their StarTree environment. When inviting new users, you can easily control user access by assigning roles. You can also update or remove roles at any time to ensure that users have the correct level of access.
In the Role Assignments screen, you can:
- View existing assignments: Easily browse and review all assignments within the system.
- Create new assignments: Grant permission by assigning a role to a user or a group.
- Assign roles to users: Grant roles to individual users based on their email.
- Assign roles to groups: Groups are defined and managed within your organization's Identity Provider (IDP). This could be a system like Okta (opens in a new tab), Azure AD (opens in a new tab), or Google Workspace (opens in a new tab).
- Delete assignments: Delete an assignment to revoke access from a user or a group.
Role assignments can't be edited. To change an assignment, delete the existing assignment and create a new one with a different role.
Getting started
Create a custom policy
You can create a custom policy to define fine-grained access to specific resources. For example, you can define a policy that allows read-only access to a specific table.
To create a custom policy, follow these steps:
- Open the Security Manager by navigating to https://dp.your_environment_id.startree.cloud/security-manager (opens in a new tab).
- Click Policies in the left navigation menu.
- Click Create policy.
- Enter a name and a description for the new policy.
- Provide the policy configuration in JSON format.
See our Custom policies page to learn more about writing your own policy configuration. - Click Create policy to save the new policy.
Testing a custom policy
Due to potential propagation delays of up to an hour, we recommended testing your policy before saving it. StarTree provides an API that allows you to simulate access requests and see how your policies would be applied.
You can use the following curl command to send a request to the Simulate API:
curl --location 'https://rbac-manager.<envt-url>/api/v1/rbac-manager/simulate-access' \
--header 'Content-Type: application/json' \
--header 'Authorization: Bearer <Token>' \
--data '{
    "policyDocumentJson": "<policy JSON>",
    "subjectTypeToSubject": {
        "<subject-type>": "<subject-id>"
    },
    "resourceSrn2String": "<resource_srn2>",
    "action": "<action>"
}'-
policyDocumentJsonis the JSON content of the policy you want to test. -
subjectTypeToSubjectidentifies the subject (user email, group name, or API token) that the API will use to simulate the policy with. The values can be one of the following pairs:subject-type subject-id emailthe user's email address (e.g., john.doe@example.com)groupThe name of the group the user belongs to, as defined in your organization's IDP service-tokenThe username portion of the service token (see how to obtain a service token's username) -
resourceSrn2Stringspecifies the resource that the you want to simulate access to. -
actionis the action the that you want to simulate on the resource (e.g.,Query,DeleteTable,UpdateSchema).
Note: The simulate access API takes into account all roles assigned to the specified subject(s). This means that if a user belongs to multiple groups or has multiple roles directly assigned, the API will evaluate the cumulative effect of all associated policies to determine access.
If you saved the policy without testing it using the simulate API, and you don't want to wait for the changes to propagate, you can still test the new policy immediately by using a private browsing window, or by clearing your browser's cache.
After clearing your cache or using a private window, you should be able to see the effects of your policy changes immediately.
Create a custom role
You can create a custom role to group together policies, allowing for precise control over what actions users can perform on specific resources.
Creating a custom role involves the following steps:
- Open the Security Manager by navigating to https://dp.your_environment_id.startree.cloud/security-manager (opens in a new tab).
- Click “Roles” in the left navigation menu.
- Click Create role.
- Enter a name and a description for the new role.
- Select the policies to be included in the new role.
You can click the Policy Details button to view the detailed configuration of a policy. - Click Create role to save the new role.
Assign roles to users and groups
In the role assignments screen you can attach roles to individual users and groups.
- Individual users are identified using their email address.
- Groups are defined and managed within your organization's Identity Provider (IDP). This could be a system like Okta (opens in a new tab), Azure AD (opens in a new tab), or Google Workspace (opens in a new tab).
To assign a role to users or groups, follow these steps:
- Open the Security Manager by navigating to https://dp.your_environment_id.startree.cloud/security-manager (opens in a new tab).
- Click Role Assignments in the left navigation menu.
- Click Assign role.
- Select the role that you want to assign.
- Select the appropriate Subject type, depending on whether the subjects are individual users or groups.
- Provide the list of user emails or group names, separated by commas
- Click Assign role to save the new assignment.