Backfill offline segment
In this recipe we'll learn how to backfill a segment moved from a real-time to offline table using the real-time to offline job.
| Pinot Version | 1.0.0 |
| Code | startreedata/pinot-recipes/backfill |
Prerequisites
To follow the code examples in this guide, you must install Docker (opens in a new tab) locally and download recipes.
Navigate to recipe
- If you haven't already, download recipes.
- In terminal, run the following command to navigate to the recipe:
cd pinot-recipes/recipes/backfillLaunch Pinot Cluster
You can spin up a Pinot Cluster by running the following command:
docker-compose upor (if you're using a Mac M1/M2)
docker-compose -f docker-compose-m1.yml upThis command will run a single instance of the Pinot Controller, Pinot Server, Pinot Broker, Pinot Minion, Kafka, and Zookeeper. You can find the docker-compose.yml (opens in a new tab) file on GitHub.
Pinot Schema and Tables
Now let's create a Pinot Schema, as well as real-time and offline tables. Pinot is going to take care of populating data into the offline table, but it still expects us to configure the table.
Schema
Our schema is going to capture some order events, and looks like this:
{
  "schemaName": "orders",
  "dimensionFieldSpecs": [{
      "name": "order_id",
      "dataType": "INT"
    },
    {
      "name": "customer_id",
      "dataType": "INT"
    },
    {
      "name": "order_status",
      "dataType": "STRING"
    }
  ],
  "metricFieldSpecs": [{
    "name": "amount",
    "dataType": "FLOAT"
  }],
  "dateTimeFieldSpecs": [{
    "name": "ts",
    "dataType": "LONG",
    "format": "1:MILLISECONDS:EPOCH",
    "granularity": "1:MILLISECONDS"
  }]
}
config/orders_schema.json
Real-Time Table
And the real-time table is defined below:
{
  "tableName": "orders",
  "tableType": "REALTIME",
  "segmentsConfig": {
    "timeColumnName": "ts",
    "timeType": "MILLISECONDS",
    "segmentPushType": "APPEND",
    "segmentAssignmentStrategy": "BalanceNumSegmentAssignmentStrategy",
    "schemaName": "orders",
    "replicasPerPartition": "1"
  },
  "task": {
    "taskTypeConfigsMap": {
      "RealtimeToOfflineSegmentsTask": {
        "bucketTimePeriod": "2h",
        "bufferTimePeriod": "1m"
      }
    }
  },
  "tenants": {},
  "tableIndexConfig": {
    "loadMode": "MMAP",
    "streamConfigs": {
      "streamType": "kafka",
      "stream.kafka.consumer.type": "lowLevel",
      "stream.kafka.topic.name": "orders",
      "stream.kafka.decoder.class.name": "org.apache.pinot.plugin.stream.kafka.KafkaJSONMessageDecoder",
      "stream.kafka.consumer.factory.class.name": "org.apache.pinot.plugin.stream.kafka20.KafkaConsumerFactory",
      "stream.kafka.broker.list": "kafka:9093",
      "realtime.segment.flush.threshold.rows": 5
    }
  },
  "metadata": {
    "customConfigs": {}
  },
  "routing": {
    "instanceSelectorType": "strictReplicaGroup"
  }
}
config/orders_table.json
The realtime.segment.flush.threshold.rows config is intentionally set to an extremely small value so that the segment will be committed after 5 records have been ingested.
In a production system this value should be set much higher, as described in the configuring segment threshold guide.
You can create the table and schema by running the following command:
docker run \
   --network backfill \
   -v $PWD/config:/config \
   apachepinot/pinot:1.0.0 AddTable \
     -schemaFile /config/orders_schema.json \
     -tableConfigFile /config/orders_table.json \
     -controllerHost "pinot-controller" \
    -exec
Offline Table
The offline table config is defined below:
{
  "tableName": "events",
  "tableType": "OFFLINE",
  "segmentsConfig": {
    "timeColumnName": "ts",
    "schemaName": "events",
    "replication": "1",
    "replicasPerPartition": "1"
  },
  "ingestionConfig": {
    "batchIngestionConfig": {
      "segmentIngestionType": "APPEND",
      "segmentIngestionFrequency": "HOURLY"
    }
  },
  "tableIndexConfig": {
    "loadMode": "MMAP"
  },
  "tenants": {},
  "metadata": {}
}
config/orders_offline_table.json
You can create this table by running the following command:
docker run \
   --network backfill \
   -v $PWD/config:/config \
   apachepinot/pinot:1.0.0 AddTable \
     -schemaFile /config/orders_schema.json \
     -tableConfigFile /config/orders_offline_table.json \
     -controllerHost "pinot-controller" \
    -update -exec
Ingesting Data
Let's ingest data into the events Kafka topic, by running the following:
docker exec -it kafka /opt/kafka/bin/kafka-console-producer.sh \
  --bootstrap-server kafka:9092 --topic orders

{"order_id":1,"customer_id":101,"order_status":"OPEN","amount":13.29,"ts":"1632463351000"}
{"order_id":2,"customer_id":102,"order_status":"IN_TRANSIT","amount":209.35,"ts":"1632463361000"}
{"order_id":3,"customer_id":103,"order_status":"COMPLETED","amount":199.35,"ts":"1632463391000"}
{"order_id":4,"customer_id":105,"order_status":"COMPLETED","amount":3.24,"ts":"1632467065000"}
{"order_id":5,"customer_id":103,"order_status":"OPEN","amount":9.77,"ts":"1632467066000"}
{"order_id":6,"customer_id":104,"order_status":"OPEN","amount":55.52,"ts":"1632467068000"}
{"order_id":7,"customer_id":104,"order_status":"CANCELLED","amount":52.54,"ts":"1632467070000"}
{"order_id":8,"customer_id":105,"order_status":"OPEN","amount":13.29,"ts":"1632667070000"}
{"order_id":9,"customer_id":105,"order_status":"IN_TRANSIT","amount":2.92,"ts":"1632667170000"}
{"order_id":10,"customer_id":105,"order_status":"COMPLETED","amount":12.22,"ts":"1632677270000"}
{"order_id":11,"customer_id":106,"order_status":"OPEN","amount":13.94,"ts":"1632677270400"}
{"order_id":12,"customer_id":107,"order_status":"OPEN","amount":20.32,"ts":"1632677270403"}
{"order_id":13,"customer_id":108,"order_status":"OPEN","amount":45.11,"ts":"1632677270508"}
{"order_id":14,"customer_id":109,"order_status":"OPEN","amount":129.22,"ts":"1632677270699"}
Data will make its way into the real-time table. We can see how many records have been ingested by running the following query:
select *
from orders
order by order_id
limit 10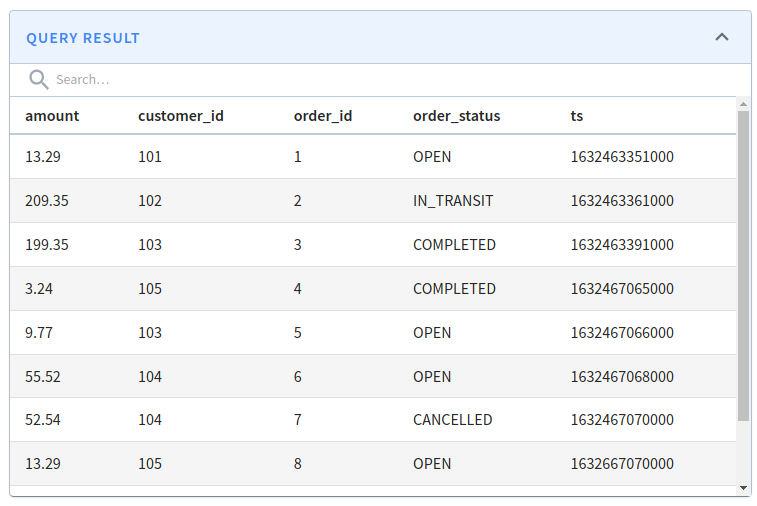 Orders query results
Scheduling the RT2OFF Job
The Real-Time to Offline Job can be scheduled automatically via the real-time table config or manually via the REST API. We can trigger it manually by running the following command:
table="orders_REALTIME"
curl -X POST \
  "http://localhost:9000/tasks/schedule?taskType=RealtimeToOfflineSegmentsTask&tableName=${table}" \
  -H "accept: application/json" 2>/dev/null | jq '.'
Output
{
  "RealtimeToOfflineSegmentsTask": "Task_RealtimeToOfflineSegmentsTask_1647620599577"
}
We can then check the Pinot Controller logs to see that it's been triggered:
docker exec -it pinot-controller grep -i "\[RealtimeToOff" logs/pinot-all.logOutput
2022/03/21 10:58:29.746 INFO [RealtimeToOfflineSegmentsTaskGenerator] [grizzly-http-server-1] Start generating task configs for table: orders_REALTIME for task: RealtimeToOfflineSegmentsTask
2022/03/21 10:58:29.763 INFO [RealtimeToOfflineSegmentsTaskGenerator] [grizzly-http-server-1] Finished generating task configs for table: orders_REALTIME for task: RealtimeToOfflineSegmentsTask
Now let's navigate to localhost:9000/#/tables (opens in a new tab). You'll see the following:
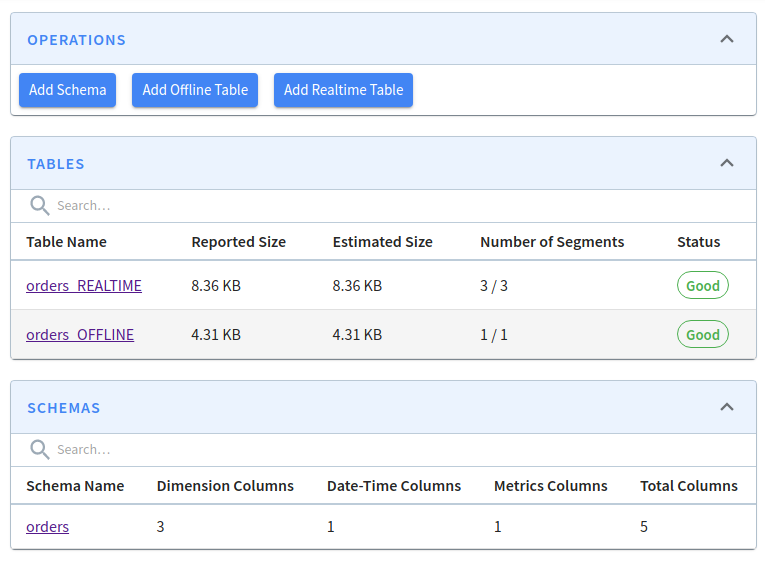 Real-Time and Offline Tables
You can see that a segment has been created in the offline table:
Viewing offline segment
You can list all the segments for a table by making the following request to the HTTP API:
table="orders"
curl -X GET "http://localhost:9000/segments/${table}" \
  -H "accept: application/json" 2>/dev/null | jq '.'
Output
[
  {
    "OFFLINE": [
      "orders_1632463351000_1632467070000_0"
    ]
  },
  {
    "REALTIME": [
      "orders__0__0__20220321T0941Z",
      "orders__0__1__20220321T0941Z",
      "orders__0__2__20220321T0941Z"
    ]
  }
]
We have one offline segment - orders_1632463351000_1632467070000_0.
You can check which records it contains by running the following query:
select *
from orders_OFFLINE
order by order_id
limit 10
Orders offline table query results
The offline table contains only the first 7 records that we ingested.
Replacing offline segment
Let's now backfill those 7 records to increase the value in the amount column by 20%.
The documents with the updated amount value are in data/orders.json, shown below:
{"order_id": 1, "customer_id": 101, "order_status": "OPEN", "amount": 15.947999999999999, "ts": "1632463351000"}
{"order_id": 2, "customer_id": 102, "order_status": "IN_TRANSIT", "amount": 251.21999999999997, "ts": "1632463361000"}
{"order_id": 3, "customer_id": 103, "order_status": "COMPLETED", "amount": 239.21999999999997, "ts": "1632463391000"}
{"order_id": 4, "customer_id": 105, "order_status": "COMPLETED", "amount": 3.888, "ts": "1632467065000"}
{"order_id": 5, "customer_id": 103, "order_status": "OPEN", "amount": 11.723999999999998, "ts": "1632467066000"}
{"order_id": 6, "customer_id": 104, "order_status": "OPEN", "amount": 66.624, "ts": "1632467068000"}
{"order_id": 7, "customer_id": 104, "order_status": "CANCELLED", "amount": 63.047999999999995, "ts": "1632467070000"}
data/orders.json
We'll ingest this file using the following ingestion spec:
executionFrameworkSpec:
  name: 'standalone'
  segmentGenerationJobRunnerClassName: 'org.apache.pinot.plugin.ingestion.batch.standalone.SegmentGenerationJobRunner'
  segmentTarPushJobRunnerClassName: 'org.apache.pinot.plugin.ingestion.batch.standalone.SegmentTarPushJobRunner'
segmentNameGeneratorSpec:
  type: fixed
  configs:
    segment.name: ${segmentName}
jobType: SegmentCreationAndTarPush
inputDirURI: '/data'
includeFileNamePattern: 'glob:**/orders.json'
outputDirURI: '/opt/pinot/data/orders/'
overwriteOutput: true
pinotFSSpecs:
  - scheme: file
    className: org.apache.pinot.spi.filesystem.LocalPinotFS
recordReaderSpec:
  dataFormat: 'json'
  className: 'org.apache.pinot.plugin.inputformat.json.JSONRecordReader'
tableSpec:
  tableName: 'orders'
pinotClusterSpecs:
  - controllerURI: '${pinotController}'
pushJobSpec:
  pushAttempts: 2
  pushRetryIntervalMillis: 1000
config/job-spec.yml
Now let's run the job to replace segment orders_1632463351000_1632467070000_0:
docker run \
   --network backfill \
   -v $PWD/config:/config \
   -v $PWD/data:/data \
   apachepinot/pinot:1.0.0 LaunchDataIngestionJob \
    -jobSpecFile /config/job-spec.yml \
    -values segmentName='orders_1632463351000_1632467070000_0' \
    -values pinotController=http://pinot-controller:9000
Once we've done that, we need to update the time boundary so that it starts from the latest time in the offline table:
curl -X POST \
  "http://localhost:9000/tables/orders/timeBoundary" \
  -H "accept: application/json"
We can re-run the query on the orders table:
select $segmentName,
       *
from orders
ORDER BY order_id
limit 20
And we'll see that the amount column for the first 7 orders has been updated:
| $segmentName | amount | customer_id | order_id | order_status | ts |
|---|---|---|---|---|---|
| orders_1632463351000_1632467070000_0 | 15.948 | 101 | 1 | OPEN | 1632463351000 |
| orders_1632463351000_1632467070000_0 | 251.22 | 102 | 2 | IN_TRANSIT | 1632463361000 |
| orders_1632463351000_1632467070000_0 | 239.22 | 103 | 3 | COMPLETED | 1632463391000 |
| orders_1632463351000_1632467070000_0 | 3.888 | 105 | 4 | COMPLETED | 1632467065000 |
| orders_1632463351000_1632467070000_0 | 11.724 | 103 | 5 | OPEN | 1632467066000 |
| orders_1632463351000_1632467070000_0 | 66.624 | 104 | 6 | OPEN | 1632467068000 |
| orders_1632463351000_1632467070000_0 | 63.048 | 104 | 7 | CANCELLED | 1632467070000 |
| orders__0__1__20230321T1038Z | 13.29 | 105 | 8 | OPEN | 1632667070000 |
| orders__0__1__20230321T1038Z | 2.92 | 105 | 9 | IN_TRANSIT | 1632667170000 |
| orders__0__1__20230321T1038Z | 12.22 | 105 | 10 | COMPLETED | 1632677270000 |
| orders__0__2__20230321T1038Z | 13.94 | 106 | 11 | OPEN | 1632677270400 |
| orders__0__2__20230321T1038Z | 20.32 | 107 | 12 | OPEN | 1632677270403 |
| orders__0__2__20230321T1038Z | 45.11 | 108 | 13 | OPEN | 1632677270508 |
| orders__0__2__20230321T1038Z | 129.22 | 109 | 14 | OPEN | 1632677270699 |
Query Results