AWS S3 connector
Amazon Web Services (AWS) S3 is an object storage service that is built to store any amount of data from anywhere and can handle massive amounts of batch data.
StarTree customers can use the AWS S3 connector to ingest data from AWS S3 into Apache Pinot.
To begin, from the StarTree Data Manager overview page, click Create a dataset. Then, on the Select Connection Type page, click Amazon S3.
Connect StarTree to AWS S3
Create a dataset
Let's go through the steps to create a dataset with AWS S3 as a Source.
-
In Data Manager, on the Overview page, click Create a Dataset, and then under Select Connection Type, click Amazon S3. The available S3 connections appear.
-
Select an existing s3 connection, or to create a new connection, refer to the methods to create a connection to AWS S3 for steps. Then, click Next.
-
Under Dataset Details, enter a name and description of the dataset.
-
Under S3 Input Selector, do one of the following:
- Use Folder Selection:
a. On the Folder Selection tab, select the Root folder(s) to ingest data from. Drill down to select specific files(s) if applicable.
b. From the Data Format list, select the data format to ingest, and then click Check Sample Data to verify your connection and sample data. A list of sample data ingested appears. Continue to step 5.
- Use S3 Path expression:
a. On the S3 Path expression tab, enter optional glob expressions to include or exclude files by specifying a regex.
Files matching this pattern are included from inputDirUri. If regex is used, all files in the specified inputDirUri are ingested. See Example glob patterns in the next section.
b. From the Data Format list, select the data format to ingest, and then click Check Sample Data to verify your connection and sample data. A list of sample data ingested appears. Continue to step 5. 5. (Optional) Record reader config is for Advanced Users to provide additional details about the source schema.
-
(Optional) Improve query performance by adding indexes to the appropriate columns and choose encoding types for each column.
-
(Optional) Configure unique details such as tenants, scheduling, data retention, and a primary key for upserts.
-
Click Next.
-
Check the details and preview data. When ready, click Create Dataset.
Example glob patterns
The following glob patterns are to be used under include patterns.(for example, my_bucket will be the s3 bucket):
glob:**/*.csv- matches all files with the .csv extension at any levelglob:s3:/myBucket/path/to/input/**.csv- matches all files with the .csv extension at any level under the paths3://myBucket/path/to/input/glob:s3:/myBucket/path/to/input/*.csv- matches all files with the .csv extension directly under the paths3://myBucket/path/to/input/glob:s3:/myBucket/path/to/input/{January,February}/*.csv- matches all files with the .csv extension directly under the paths3://myBucket/path/to/input/January/ors3://myBucket/path/to/input/February/glob:s3:/myBucket/*/data/*.csv- matches all files with the .csv extension that has a path likes3://myBucket/ANY_FOLDER/data/ANY_FILE.csv
The following glob patterns show an example where it matches all csv files within abc/ folder with one level deep in all folders except folder1
- Include pattern:
glob:s3:/*/abc/*.csv - Exclude pattern:
glob:s3:/folder1/abc/*.csv
Methods to create a connection to AWS S3
Use one of the following methods to create a connection to AWS S3:
- AWS access and secret keys
- AWS cross-account Identity and Access Management (IAM) roles
Select one of the connection creation options to continue.
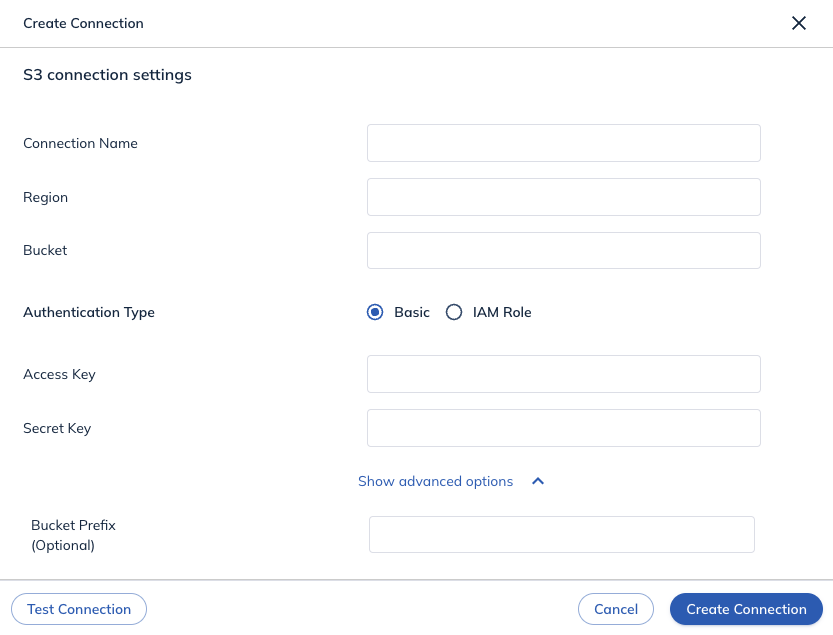
Option 1: Create a connection using access and secret keys
You'll need the following information to create an Amazon S3 connection using your AWS Access Key and Secret Key pair.
- Region: AWS region where the S3 bucket resides. You can find this information in the S3 dashboard.
- Bucket: The name of the bucket from which the data will be ingested. Optional: To avoid giving access to the entire bucket, create a folder within the bucket; you will need to use this folder as the input path.
- Access & Secret Key: You can generate AWS Account and Access Keys in the AWS IAM console (opens in a new tab).
- Bucket Prefix (Optional): A prefix string for input data.
- Input:
s3://my-bucket-name/aaa/*.avro, Prefix:aaa/ - Input:
s3://my-bucket-name/aaa/bbb/*.avro, Prefix:aaa/bbb/
- Input:
Create an AWS access and secret key pair
If you do not have an access key and secret key pair, complete the following steps to generate one:
-
Open the AWS IAM console (opens in a new tab), click Users, and click Add users.
-
Enter a User name, such as
startree-my-stream-user, and click Next. -
Under Permission options, select Attach policies directly.
-
Use search to find the policy name you created earlier, it was
s3-my-bucket-policyin our example. Click Next and click Create user. -
Return to the AWS IAM Dashboard, click Users, then select the user name that you just created, like
startree-my-user-policyin our example. -
Select the Security credentials tab and click Create access key.
-
Click Application running on an AWS compute service, click Next, and click Create access key.
-
Copy the Access key and the Secret access key from here and enter them in the Data Manager.
Continue in the Create dataset section.
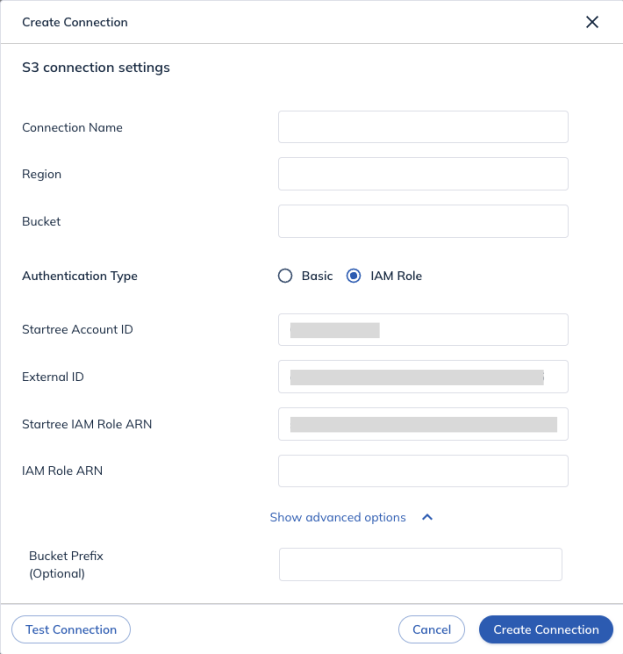
Option 2: Create a connection using AWS IAM roles
You will need the following information to create a connection with Amazon S3 when using AWS IAM Roles:
- Region: The AWS region where the S3 bucket resides. You can find this information in the Amazon S3 dashboard.
- Bucket: The name of the bucket from which the data will be ingested.
- IAM Role ARN: The Customer-provided IAM Role ARN that will be assumed by the StarTree Data Plane.
- Bucket Prefix (Optional): A prefix string for input data.
- Input:
s3://my-bucket-name/aaa/*.avro, Prefix:aaa/ - Input:
s3://my-bucket-name/aaa/bbb/*.avro, Prefix:aaa/bbb/
- Input:
Configure AWS IAM policy
-
Open the AWS IAM dashboard, click Policies, and click Create policy.
-
Click to open the JSON tab and create the following policy, replacing my-bucket-name with the bucket name that you will use to establish the connection.
{
   "Version": "2012-10-17",
   "Statement": [
      {
         "Effect": "Allow",
         "Action": [
            "s3:List*",
            "s3:GetObject"
         ],
         "Resource": [
            "arn:aws:s3:::my-bucket-name",
            "arn:aws:s3:::my-bucket-name/*"
         ]
      }
   ]
}- Provide the Policy name, such as
s3-my-bucket-policy, and click Create policy.
Create an AWS IAM role
If you do not have an AWS IAM role, follow these steps to generate one.
-
Find the following information. You will need it in later steps.
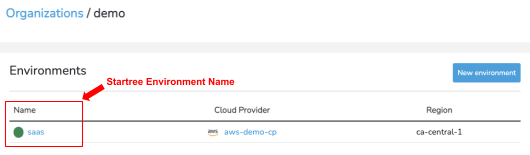
- StarTree Account ID and External ID from the Data Manager UI.
- StarTree environment name from the StarTree Cloud Portal.
-
Check your Security Token Service (STS) configuration
- Open the AWS IAM console (opens in a new tab) and click Account settings.
- If the Security Token Service (STS) is not currently in Active status for the region that you have S3 bucket, set it to Active.
-
In the AWS IAM console, click Roles in the left menu bar, click Create role.
-
In the AWS IAM console, click AWS account for Trusted entity type.
- If your S3 bucket and StarTree Data Plane run on the same account you are currently using to access the AWS IAM console, click This Account.
- If your S3 bucket and StarTree Data Plane use a different account, from the StarTree Data Manager copy the StarTree AWS Account information and paste it into the Another AWS Account field. Then copy the External ID and paste it into the External ID field.
-
Use search to find the policy name you created earlier, it was
s3-my-bucket-policyin our example, and then click Next. -
If the External ID referred to previously has the
env-*prefix, skip to step 7. Otherwise, enter the following:
- Role name: Enter a role name, such as
startree-my-stream-role. - Tags: Enter a key-value pair.
- Click Create role. Navigate to the Summary page. Copy the ARN field and enter it into the IAM Role ARN field in the Data Manager UI.
- Click Create Connection.
- Continue to the Create a dataset section.