Cloud Provider
In this guide we're going to learn how to add a cloud provider to a StarTree Cloud account. You will need to have created an organization and user.
StarTree supports AWS and GCP as cloud providers. You will need to configure a cloud provider before you can deploy an an environment.
From the organizations screen, click the Cloud Providers tab. You will see the following screen:
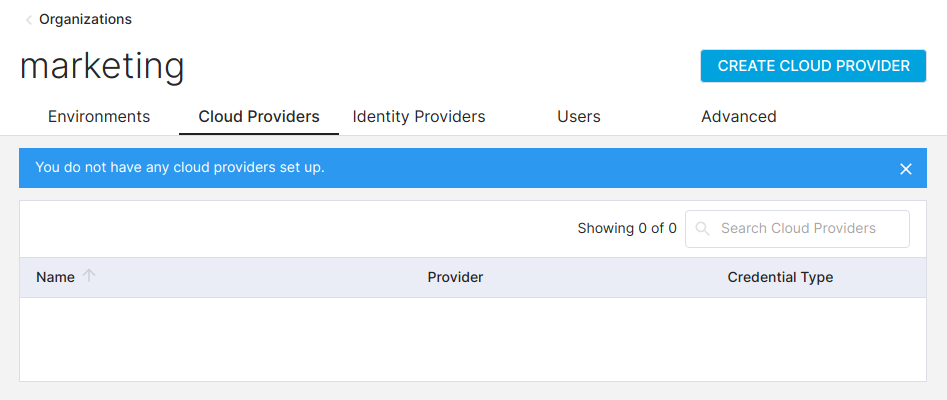 Cloud Provider
Click on Create Cloud Provider in the top right. You will see the following screen:
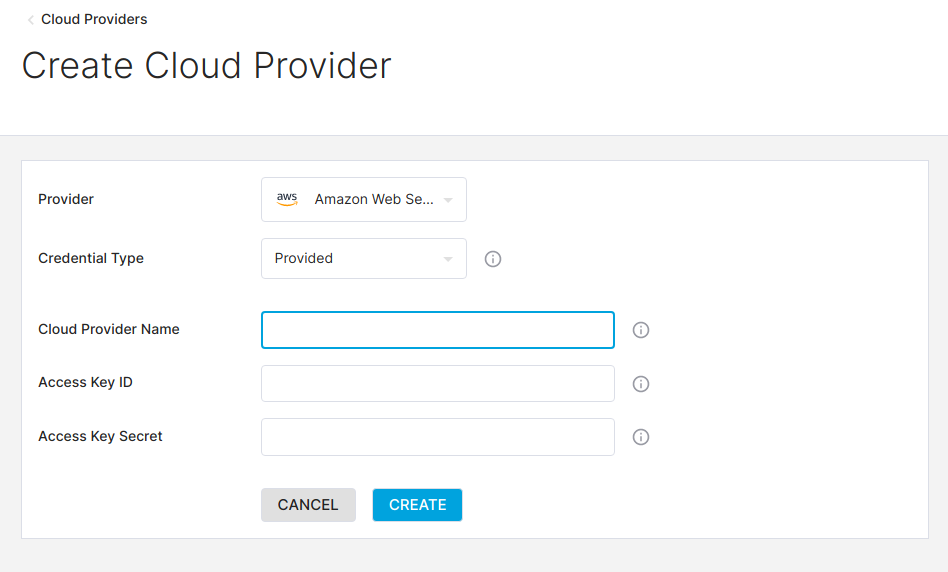 Select Cloud Provider
Select your preferred cloud provider and then follow the appropriate instructions below.
AWS
StarTree Cloud expects to operate in a dedicated AWS account, under your AWS Organization to ensure nothing (quotas, permissions, billing, audits) collides with your existing workloads. This is a best practice mechanism for supporting external vendor management. For instructions on creating a new account, see the AWS official documentation (opens in a new tab).
Select the Delegated credential type. You will see the following screen:
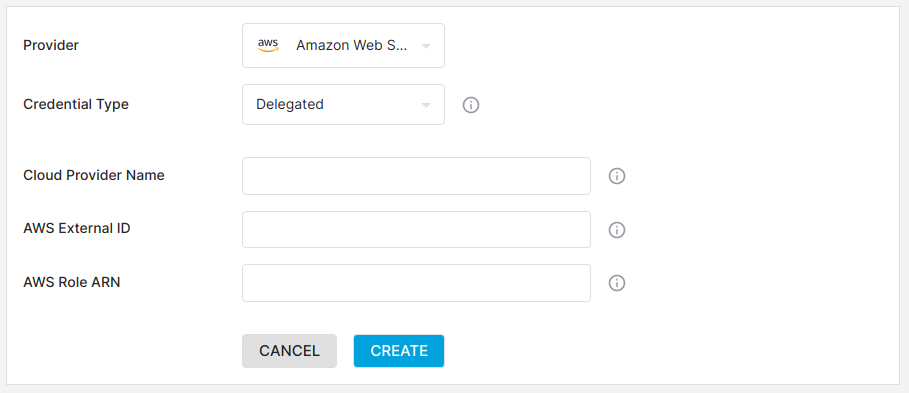 AWS Delegated Cloud Provider
Enter a value for the AWS External ID.
This can be any value, but it's best if it's not easily guessable (e.g. a UUID). We'll need to use this value when we create the IAM Role later on in this guide.
Create an IAM Policy
In another browser tab, navigate to the IAM Policy management dashboard (opens in a new tab) and open the JSON tab.
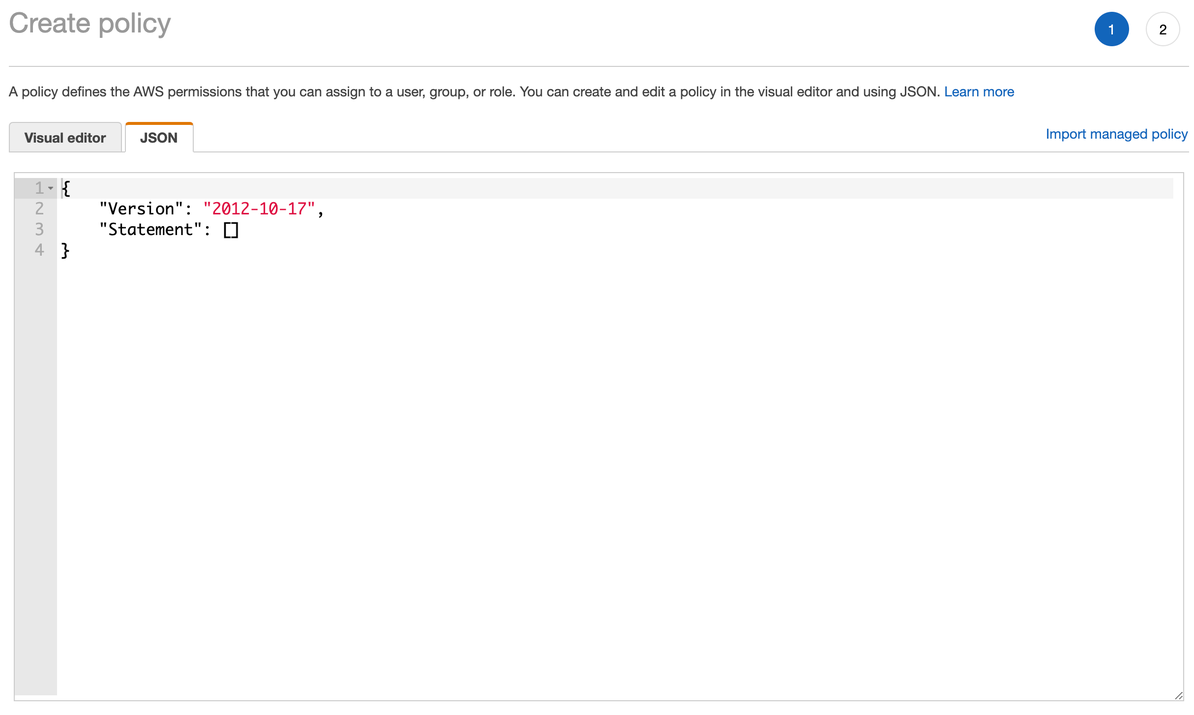 Create an IAM Policy
Copy the following JSON into the editor:
{
    "Version": "2012-10-17",
    "Statement": [
        {
            "Sid": "VisualEditor0",
            "Effect": "Allow",
            "Action": [
                "eks:DescribeAddon",
                "eks:DeleteNodegroup",
                "eks:DescribeCluster",
                "eks:TagResource",
                "eks:DisassociateIdentityProviderConfig",
                "eks:AssociateEncryptionConfig",
                "eks:UntagResource",
                "eks:DescribeUpdate",
                "eks:AssociateIdentityProviderConfig",
                "eks:DescribeIdentityProviderConfig",
                "eks:AccessKubernetesApi",
                "eks:CreateAddon",
                "eks:ListNodegroups",
                "eks:UpdateClusterConfig",
                "eks:UpdateAddon",
                "eks:DescribeNodegroup",
                "eks:DeleteCluster",
                "eks:UpdateClusterVersion",
                "eks:UpdateNodegroupVersion",
                "eks:DescribeAddonVersions",
                "eks:ListTagsForResource",
                "eks:CreateCluster",
                "eks:UpdateNodegroupConfig",
                "eks:ListClusters",
                "eks:CreateNodegroup",
                "eks:DeleteAddon",
                "eks:ListAddons",
                "eks:ListIdentityProviderConfigs",
                "eks:ListUpdates",
                "sts:GetCallerIdentity"
            ],
            "Resource": "*"
        },
        {
            "Effect": "Allow",
            "Action": [
                "ec2:DescribeAddresses",
                "ec2:DescribeVpcs",
                "ec2:DescribeVpcAttribute",
                "ec2:DescribeAccountAttributes",
                "ec2:DescribeKeyPairs",
                "ec2:DescribeImages",
                "ec2:DescribeSubnets",
                "ec2:DescribeSecurityGroups",
                "ec2:DescribeInternetGateways",
                "ec2:DescribeRouteTables",
                "ec2:DescribeNetworkAcls",
                "ec2:DescribeNatGateways",
                "logs:DescribeLogGroups",
                "autoscaling:DescribeLaunchConfigurations",
                "autoscaling:DescribeAutoScalingGroups",
                "autoscaling:CreateLaunchConfiguration",
                "autoscaling:DeleteLaunchConfiguration",
                "autoscaling:UpdateAutoScalingGroup"
            ],
            "Resource": "*"
        },
        {
            "Effect": "Allow",
            "Action": [
                "iam:GetRole",
                "iam:GetPolicy",
                "iam:GetPolicyVersion",
                "iam:ListRolePolicies",
                "iam:ListAttachedRolePolicies",
                "iam:GetInstanceProfile",
                "iam:PassRole"
            ],
            "Resource": [
                "arn:aws:iam::<account_id>:instance-profile/sc-*",
                "arn:aws:iam::<account_id>:policy/sc-*",
                "arn:aws:iam::<account_id>:policy/StarTree*",
                "arn:aws:iam::<account_id>:role/sc-*",
                "arn:aws:iam::<account_id>:role/aws-service-role/eks-nodegroup.amazonaws.com/AWSServiceRoleForAmazonEKSNodegroup"
            ]
        },
        {
            "Effect": "Allow",
            "Action": [
                "s3:ListBucket",
                "s3:GetAccelerateConfiguration",
                "s3:GetLifecycleConfiguration",
                "s3:GetReplicationConfiguration",
                "s3:GetEncryptionConfiguration",
                "s3:GetBucket*"
            ],
            "Resource": "arn:aws:s3:::sc-*"
        }
    ]
}
Click on Next: Tags and add tags for your own house keeping. Click on Next: Review and enter a name and description for the policy.
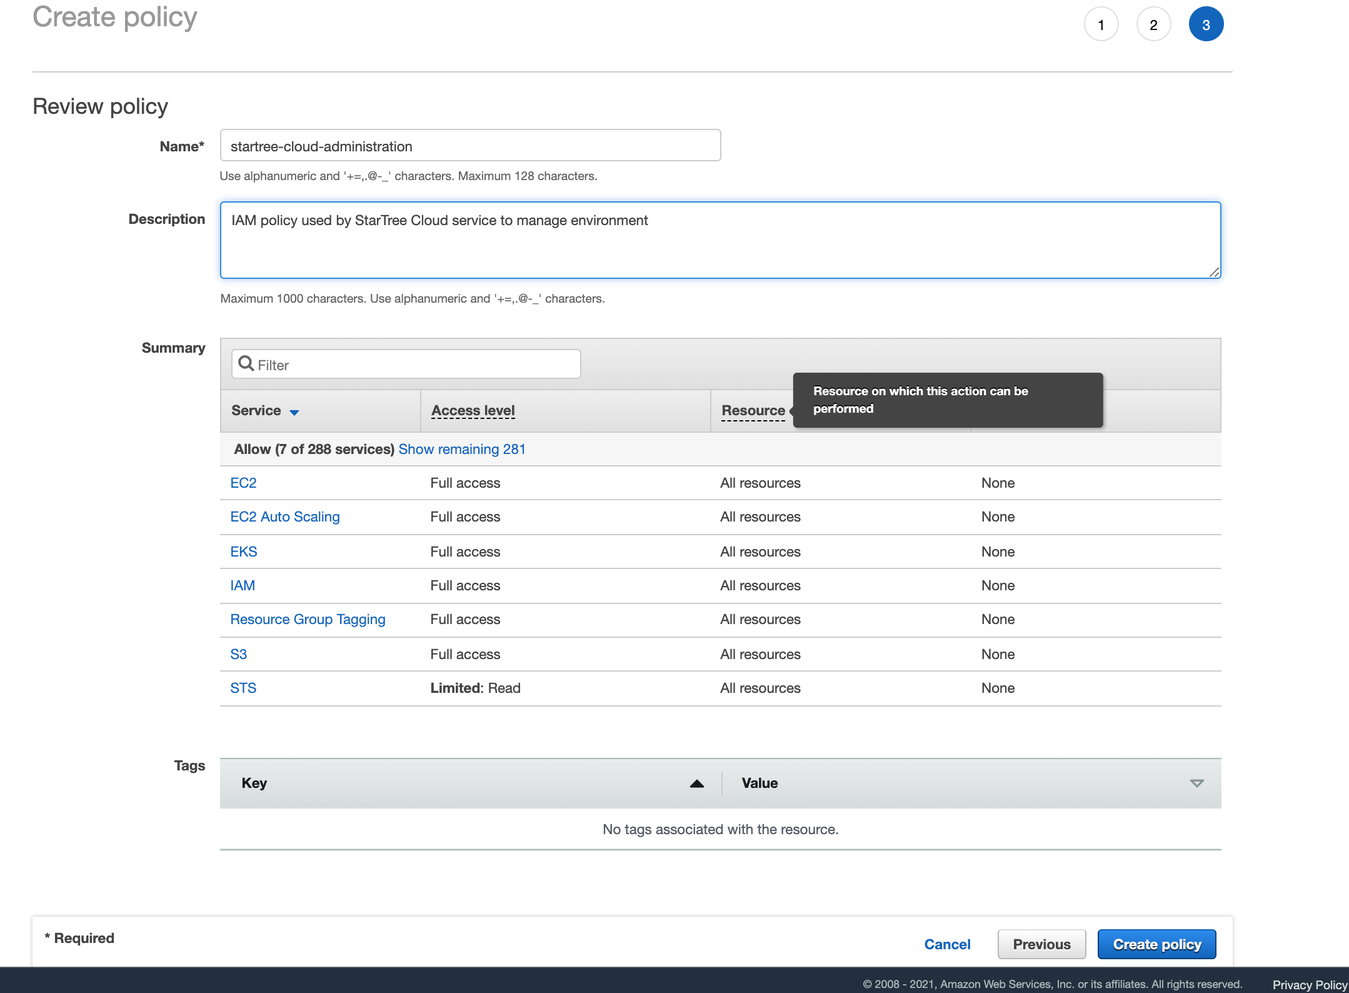 Review IAM Policy
Once you've done this, click Create policy.
Create an IAM Role
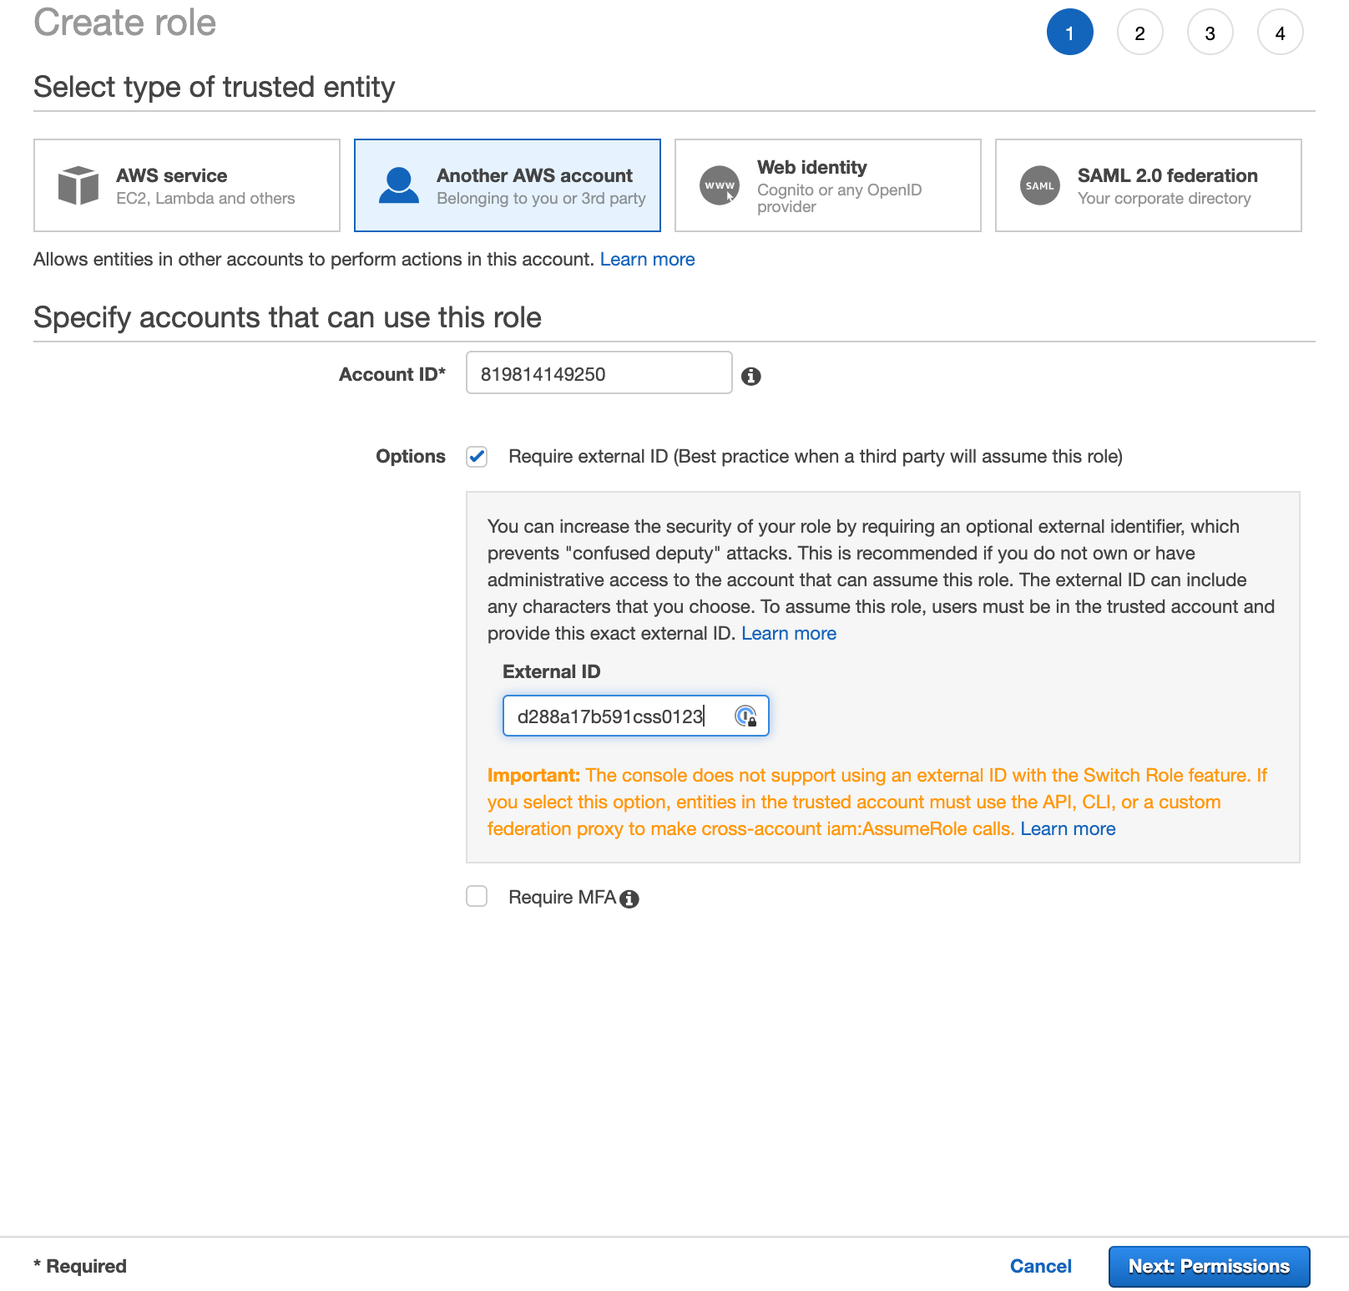
Navigate to New Role (opens in a new tab) from the AWS Console and pick “Another AWS account“ as a type of trusted entity. Enter 819814149250 as “Account ID” and check the “Require external ID” option.
Go back to the StarTree Cloud UI and copy the AWS External ID onto your clipboard.
Return to the AWS Console and paste that value into the External ID field. Proceed by clicking on “Next: Permissions”.
 IAM Role
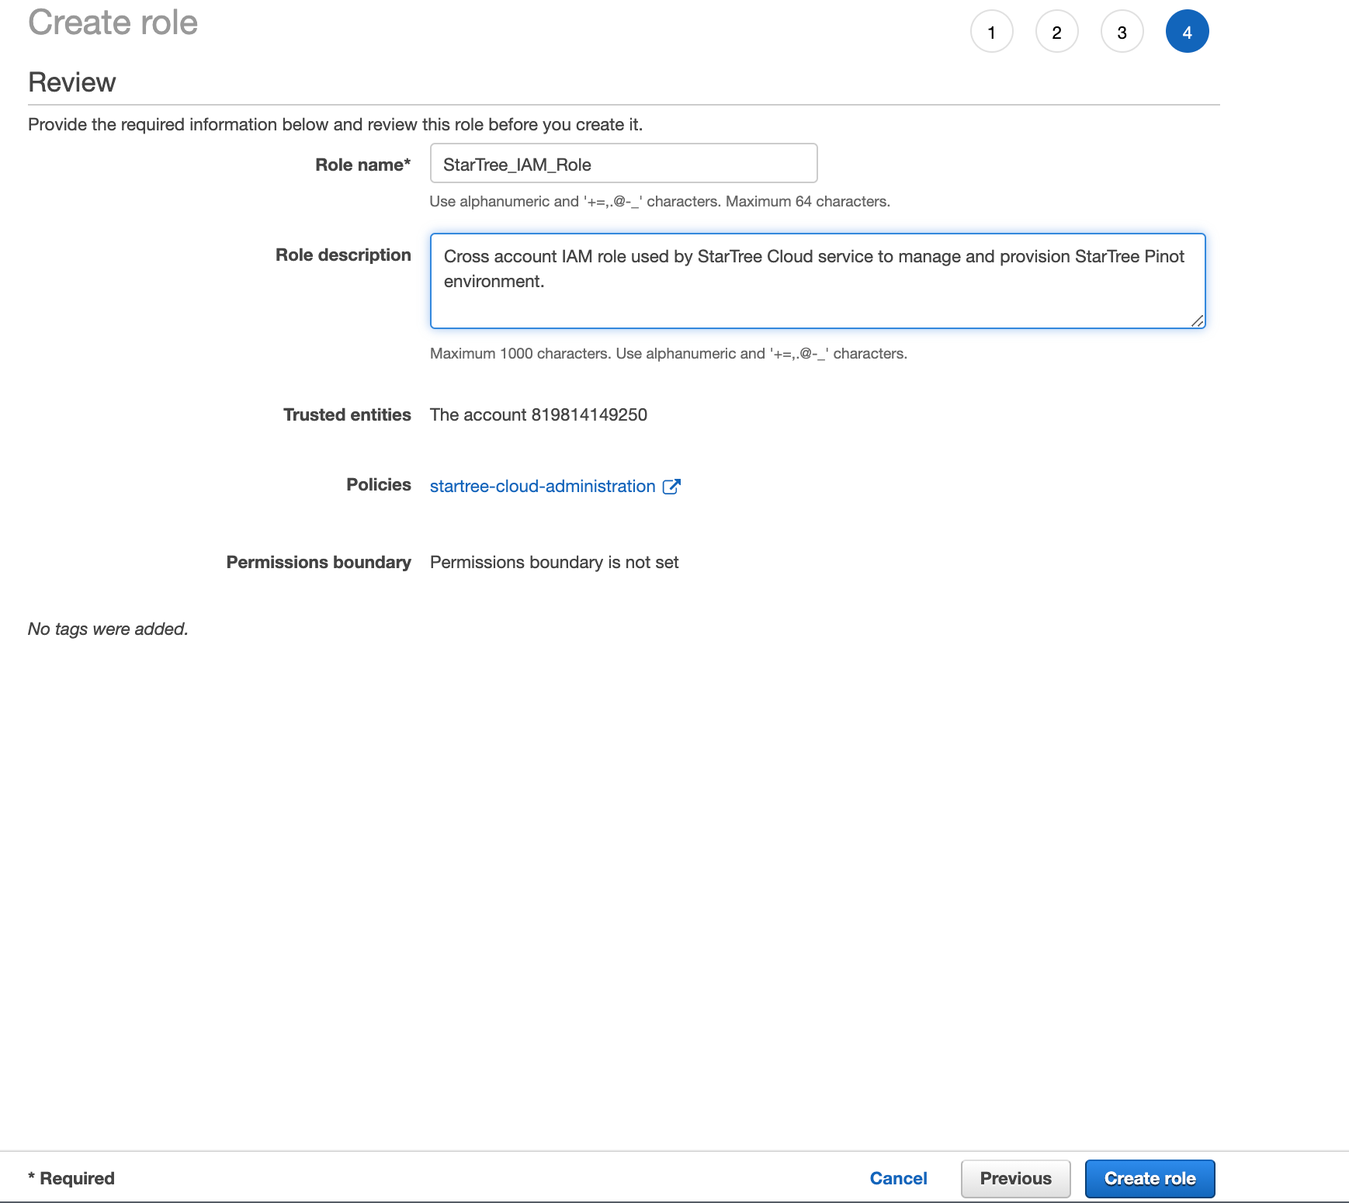
In this next section, use the “filter policies” search bar to search for the policy created in the previous step. Once found, check it and click on “Next: Tags“. Feel free to add custom tags for your own house keeping. Once you've done that, click on “Next: Review“. Enter a name of your preference for the role and click “Create role“.
 Create role
A notification will confirm that the Role is successfully created. Click on its name to access the Role details page.

Configure IAM Role ARN
Click on the role created above and in the Summary section copy the Role ARN field.
Go back to the StarTree Cloud UI and copy this value into the AWS Role Arn field. Enter a name for the cloud provider if you haven't already and click on the Create button.
Your cloud provider is now configured.
StarTree Cloud expects to operate in a dedicated GCP Project owned by your organization to ensure nothing (quotas, permissions, billing, audits) collides with your existing workloads. Interactions with Pinot may occur through peering with VPCs hosting your datasources and client applications.
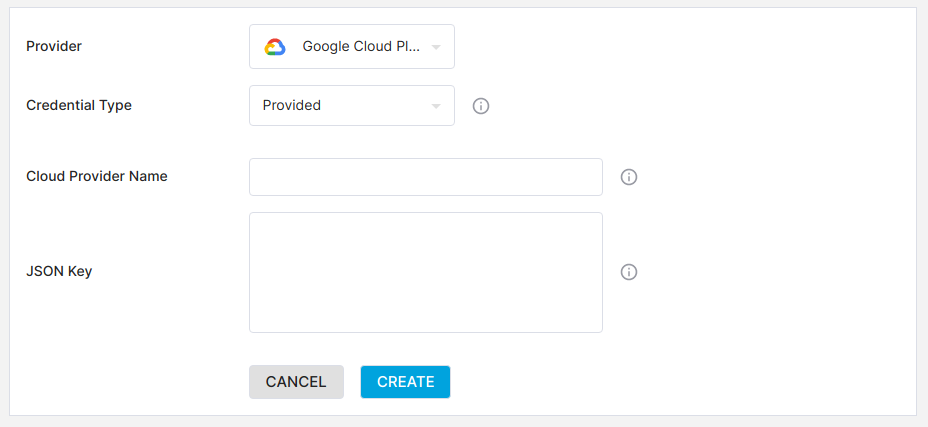
Select the Provided credential type. You will see the following screen:
 GCP Delegated Cloud Provider
We need to create a service account and then generate a key that we can paste into the Json key field.
Configure GCP project
The following services must be activated for the target GCP Project:
- Service Usage API
- Cloud Storage
- Compute Engine API
- Kubernetes Engine API
Configure service account
Create a service account by going to console.cloud.google.com/apis/credentials (opens in a new tab). Click Create Credentials > Service account and then provide a name for the account and assign it access to the following resources:
- Compute Admin
- Compute Network Admin
- Kubernetes Engine Admin
- Security Admin
- Service Account Admin
- Service Account Key Admin
- Service Account User
- Service Usage Admin
- Storage Admin
Once you've done that, click Done.
Now click on the pencil icon next to the service account under Service Accounts and then click KEYS to generate a service account key. A JSON file will be downloaded to your machine.s
Open the JSON file, copy its contents, and paste it into the Json key field on the StarTree Cloud UI.
Enter a name for the cloud provider if you haven't already and click on the Create button.
Your cloud provider is now configured.